Sunday, 2 June 2019

Fretboard binding

I did more work on the fretboard. First I cut each edge straight - you may remember last week that I'd had to leave the last couple of inches of the board's edge untouched so as not to carve the neck template's tenon into them. I corrected this by using a piece of straight scrap as a template to finish off the edges in the router:


Then I applied the binding. First I used my follower bit with a smaller bearing to cut a test channel, and make sure that my bearing size gave a binding channel the right size for my 1.5mm binding. The binding I'm using is 1.5mm 'vintage cream' plastic binding. It fitted perfectly:


Then I used the same straight edge that the fretboard was already attached to, and ran my router with the bearing and follwer bit up the side of it. This removes 1.5 mm thickness from each side of the fretboard:


The fretboard is now too thin (relative to the width of the neck) by three mm. We will glue the binding strips to either side to bring it back up to the correct width:


This is what the binding will look like when attached to the board:


I planned to use some solvent acrylic glue ('Weld-on 16'') to attach the binding. It's the same stuff I used for the binding on my telecaster body. It cures very quickly, so you need to be ready - the pieces were cleaned with white spirit, and stripes of tape prepared to clap the binding together:


In the event, my glue had cured in the pot to a big block of jelly :/. I came up with another plan..


I clamped the binding to the fretboard tightly with tape:


On both sides:

Then filled a pipette with thin CA glue. This stuff wicks into gaps really well:


I then dropped the CA glue onto the joint between the binding and the fretboard:


Like so:

And went along the entire fretboard:


Front and back:

 I then removed the tape, and dropped into the joint that had been covered up. Once complete, the binding was nicely attached, and will continue to get more secure as the glue cures overnight. I suspect this method wicked some CA into the fret slots, but I have a tool that should be able to pick that out.

Here's the fretboard on the neck:


And the neck and fretboard on the guitar: 


I'm very happy with how the binding looks. I'll add the small piece at the bottom of the fretboard once it's finally finish sanded.

The next jobs are, unfortunately, more sanding on the fretboard. It's currently at 120 grit - I need to take it up towards 600 grit. Following that, I'll probably try to finish the neck - shaping and drilling the tuner holes.

I also need to make a decision about the headstock logo - whether to use a decal, or attempt to inlay something...

Monday, 27 May 2019

Fretboard shaping

There's not many jobs left to do on this guitar, but they're all quite intimidating. Left is the top shaping, neck carve, binding and finishing the fretboard.

I started on the fretboard. It was too long, so I trimmed it off:


Next up, the inlay gaps had to be filled. They weren't huge, and they're about as good as I've done, but there were still little gaps around the inlay:


I sanded off a load of dust from an offcut of the same wood, and filled up the gaps with it.


Then flooded the area with thin CA - the thin stuff wicks nicely into the gaps, sealing in the dust and filling all the gaps up. Once done, it looks horrible, and you'll think that you've destroyed your lovely fretboard:


To get rid of all the dried on superglue and excess dust, I had to use the fret radius block again. I re-attached the fretboard to the radius jig,


And went at it with the radius block CA is really hard when it dries, and it eats through and clogs up sandpaper. It took a number of changes of paper, and an unexpectedly long time to grind all the excess CA off the inlays:


This isn't the final finish. There's still more low grit sanding to go on the fretboard as I expect to knock it or scratch it when I do the binding on it. I stopped when most of the CA was gone - you can see that the gaps around the inlays have now gone, and that they should look pretty tidy in the end!


Next up was to shape the fretboard to the right size - at the minute it's rectangular. First I trimmed the bridge end of the board to size:

 And spend a little while marking out exactly where it should be positioned on the neck template - it's crucial that it's both square (frets at exactly 90 degrees to the centre line) and positioned right relative to the nut:


I glued / taped it down to the template. I'm going to use a router to shape it, but you can see from the photo that I do not want to follow the shape of the template all the way down, as I'll make a tenon out of it! I mark this with tape, so when I'm routing I know where to stop:


Next up, I decided to make a jig to hold the router. I secured the router gate onto a few bits of MDF:


Which would hold the router at the right height, and allow me to move the neck against the follower bearing, underneath the router. This has the great advantage that the router will not move from 90 degrees to the work piece which can happen fairly easily and which will instantly ruin this fretboard:


From the side:


After shaping, the fretboard has now reached it's final shape. Next up will be to bind it:


Tuesday, 26 March 2019

It's a trap!

I spent the past couple of months doing stuff around the house - which including making space to move a load of stuff out of the shed to give me a little more space :] : 


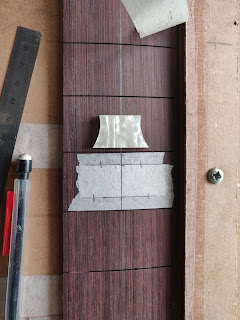
The first job I wanted to tackle was to do the fretboard inlays. Whilst I've done some inlay in the past, this would be the most significant amount I've done on a single fret board. I picked up some celluloid trap inlays from Small Wonder and set to work a week or so ago:


I think that Gibson originally used celluloid (or some more flammable version of it) in the 50's. I went for them rather than the mother of pearl slightly for authenticity reasons, slightly because they're a bit bling'ier, slightly because they're thicker and more forgiving to work with.

After double and triple checking the fret numbers (I'm sure it's an easy mistake to put them in the wrong position - probably one I'll make one day...) I marked centre lines:


And marked the position of the inlay:


Which I scribed round with a knife, scribing the position into the fretboard at the same time:


Then I set up my dremel in its jig:


And set the depth to be just shallower than a piece of the inlay. I'll creep up on the depth in a couple of passes of routing:


I hogged out the bulk of the inlay area:


And then tidied up around the edges, getting as close to the masking tape as I could:


Whilst the dremel is great to move material out of the fretboard, it isn't an accurate tool. Rather than try to straighten up the edges with it,  I use a very sharp chisel to make straight cuts down:


The router bit also couldn't reach right into the sharper corners of the inlay. I used my smallest chisel to get into the corners:


Which tightened up the rout:


And yielded a nice tight fit for the inlay piece:


I carried on working down the fretboard, here the last few inlays are marked on the tape...:


...routed out...


... and chiselled out. I accidentally got a bit close to the fret slot on the 21st fret, I'll keep an eye on that one during future stages to make sure it doesn't get damaged:


It was now time to glue in the inlays. I'll just use superglue to fix them in. I sanded the bottom of them to rough them up a bit for the glue:


And flooded each rout with CA glue before pushing the inlays in:


And the first stage of the fretboard inlays are finished:


The inlays stand a little proud of the surface. This is due to both the radius on the fretboard (so the bits furthest from the centre stick out the most) and the fact that I routed the holes half a mm or so shy of the height of the inlay blocks. 

The celluloid apparently sands nicely without losing its pattern or getting colour inconsistencies, so the next step will be to them flush with the fretboard. I'll also fill in the small gaps around the side of the inlays with sawdust and CA glue.