I spent the past couple of months doing stuff around the house - which including making space to move a load of stuff out of the shed to give me a little more space :] :
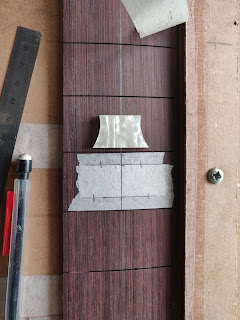
The first job I wanted to tackle was to do the fretboard inlays. Whilst I've done some inlay in the past, this would be the most significant amount I've done on a single fret board. I picked up some celluloid trap inlays from Small Wonder and set to work a week or so ago:
I think that Gibson originally used celluloid (or some more flammable version of it) in the 50's. I went for them rather than the mother of pearl slightly for authenticity reasons, slightly because they're a bit bling'ier, slightly because they're thicker and more forgiving to work with.
After double and triple checking the fret numbers (I'm sure it's an easy mistake to put them in the wrong position - probably one I'll make one day...) I marked centre lines:
And marked the position of the inlay:
Which I scribed round with a knife, scribing the position into the fretboard at the same time:
Then I set up my dremel in its jig:
And set the depth to be just shallower than a piece of the inlay. I'll creep up on the depth in a couple of passes of routing:
I hogged out the bulk of the inlay area:
And then tidied up around the edges, getting as close to the masking tape as I could:
Whilst the dremel is great to move material out of the fretboard, it isn't an accurate tool. Rather than try to straighten up the edges with it, I use a very sharp chisel to make straight cuts down:
The router bit also couldn't reach right into the sharper corners of the inlay. I used my smallest chisel to get into the corners:
Which tightened up the rout:
And yielded a nice tight fit for the inlay piece:
I carried on working down the fretboard, here the last few inlays are marked on the tape...:
...routed out...
... and chiselled out. I accidentally got a bit close to the fret slot on the 21st fret, I'll keep an eye on that one during future stages to make sure it doesn't get damaged:
It was now time to glue in the inlays. I'll just use superglue to fix them in. I sanded the bottom of them to rough them up a bit for the glue:
And flooded each rout with CA glue before pushing the inlays in:
And the first stage of the fretboard inlays are finished:
The inlays stand a little proud of the surface. This is due to both the radius on the fretboard (so the bits furthest from the centre stick out the most) and the fact that I routed the holes half a mm or so shy of the height of the inlay blocks.
The celluloid apparently sands nicely without losing its pattern or getting colour inconsistencies, so the next step will be to them flush with the fretboard. I'll also fill in the small gaps around the side of the inlays with sawdust and CA glue.


